Tenants & Landlords: 3 Day Photo Linked Move In Inventory Checklist
Complete and sign a room-by-room inventory with time-stamped photos within three days of moving in. This protects deposit rights and heads off disputes before they start. At minimum, your checklist needs signatures from both parties, photo evidence tied to each item, and an exact count of keys received. The printable template below covers every room, fixture, and safety device you need to record.
TL;DR:
- Completing the inventory within three days of move-in reduces disputes by providing timely, accurate condition documentation that is harder for either party to dispute later.
- Both tenant and landlord must sign every page and keep a copy, ensuring mutual agreement and clear reference points during move-out or disputes.
- Photos should be timestamped, unedited, and referenced with consistent filenames linked to specific checklist items to serve as credible evidence in legal or deposit disputes.
- Key safety devices and major appliances require testing and documented confirmation during move-in to prevent safety-related deposit deductions or liability issues.
- Using standardized checklists for room-by-room condition reports, including detailed notes and photos, is essential for establishing baseline conditions and supporting fair deposit return processes.
Table of Contents
- A fillable move-in inventory template: exterior, rooms, fixtures, appliances, and keys
- How to complete, sign, share, and retain the move-in inventory
- How to take and organize photos and video so they clearly support the checklist
- Condition legend, shorthand codes, and a concise keys inventory to use at check-in
- When to consider a managed inventory and check-in service
- Practical perspective: frequent move-in mistakes and quick fixes
- FAQ
- Sources
- Primary sources and downloadable checklist templates to reference or download
A fillable move-in inventory template: exterior, rooms, fixtures, appliances, and keys
A usable inventory starts with the basics: property address, tenant and landlord contact details, the move-in date, the date of inspection, and signature lines for everyone present. Skip any of these and the document loses its value if a dispute ever reaches a deposit hearing or small claims court.
From there, work through the property in a fixed order so nothing gets missed. Government and housing authority templates consistently list the same core areas: living spaces, kitchen, bedrooms, bathrooms, exterior, and safety devices, each with columns for condition on arrival and condition at move-out, according to the Colorado rental property checklist. Following that same structure keeps your version compatible with what most landlords and courts already expect.
Each row in your checklist should capture:
- Item: the specific fixture, surface, or appliance (e.g., “kitchen faucet,” “bedroom 2 closet door”).
- Condition on arrival: using the rating scale covered later in this guide.
- Notes: a short written description of any damage, wear, or missing part.
- Photo reference: the filename of the photo that documents this item.
- Quantity: for countable items like keys, remotes, or smoke detectors.
- Replacement cost (optional): useful for landlords estimating potential deductions.
Here’s how that structure looks applied to a typical property:
| Area | Item | Condition on arrival | Photo reference |
|---|---|---|---|
| Kitchen | Refrigerator | Good | kitchen_fridge_2026-05-01.jpg |
| Kitchen | Stove/oven | Excellent | kitchen_stove_2026-05-01.jpg |
| Kitchen | Dishwasher | Fair, interior rust spot | kitchen_dishwasher_2026-05-01.jpg |
| Living room | Carpet | Good, minor wear by door | living_carpet_2026-05-01.jpg |
| Bedroom 1 | Smoke alarm | Tested, working | bed1_smoke_2026-05-01.jpg |
| Bathroom | Exhaust fan | Good | bath_fan_2026-05-01.jpg |
| Exterior | Fence/gate | Fair, loose latch | exterior_gate_2026-05-01.jpg |
Beyond the rooms themselves, a complete checklist covers appliance checks for the refrigerator, stove, and dishwasher, safety checks for smoke and carbon monoxide alarms, the location of utility meters, and any outdoor areas like yards, decks, or sheds. University and tenancy guidance, including the Berkeley Student Legal Services move-in checklist, builds in explicit fields for photo and video evidence alongside each item, which is worth copying into your own version regardless of where you live.
Many official templates also recommend that tenants test smoke and carbon monoxide alarms during the walkthrough and sign a line confirming the alarms were tested in their presence and found working, a detail drawn from practice in Colorado’s rental condition checklist. That single line of documentation can matter a great deal if a safety issue comes up later.
Finally, every template needs a condition-rating legend. Use Brand New, Excellent, Good, Fair, or Poor for full descriptions, and shorthand codes like NC (needs cleaning), NR (needs repair), or RP (replace) for quick notes in tight spaces. The next sections explain exactly how to use these codes and how to complete the process from start to finish.
How to complete, sign, share, and retain the move-in inventory
Timing matters as much as content. Complete your condition inspection promptly after moving in, as recommended across multiple official checklists and guidance sheets to ensure accurate evidence before memory fades. Waiting a week to document a stained carpet makes it harder to prove the stain was already there.
The process itself works best as a joint effort:
- Walk through the property together with the tenant and landlord (or property manager) present, whenever that’s possible.
- Go room by room, filling in condition notes and taking photos as you go rather than relying on memory afterward.
- Flag anything questionable in writing immediately rather than making a verbal note to “deal with it later.”
- Have both parties sign every page, or initial additional pages if the document runs long, matching the practice shown in the Rushcliffe inventory and home condition report.
- Give each party a dated copy on the spot, whether that’s a physical printout or an emailed PDF.
If something concerns you during the walkthrough, write it down on the inventory itself, but keep repair requests as a separate communication to the landlord or property manager. Mixing a condition note with a repair demand on the same document can confuse which parts are an agreed record of condition and which parts are an open request.
Pro Tip: Scan or photograph the signed inventory the same day and save it to a cloud folder shared with the other party, so neither side can later claim they never received a copy.
Storage matters just as much as completion. Keep the original signed pages, export a PDF version for your records, and back up every photo and file to a cloud folder with a clear naming system. Retain these records for the full length of the tenancy, and don’t delete anything until any deposit dispute is fully resolved. A folder that takes five minutes to set up at move-in can save hours of arguing at move-out.
How to take and organize photos and video so they clearly support the checklist
Photos only help if they’re easy to connect to a specific checklist line. Start each item with a wide-angle shot of the room, then follow with close-ups of any damage, wear, or detail worth recording. For appliances, photograph serial numbers and, where relevant, current meter readings, since these details can matter later for billing or warranty questions.
A few habits make a real difference in how credible your evidence is:
- Use your camera’s built-in time stamp, or include a phone screen showing the date somewhere in the frame.
- Keep original, unedited files rather than cropped or filtered versions, since edits can raise questions about what was altered.
- Adopt a consistent filename convention, such as “kitchen_sink_2026-05-01.jpg,” and reference that exact filename in the matching checklist row.
- Record a short video, under 60 seconds, panning each room and narrating the condition out loud, then note that video’s filename on the checklist too.
A signed checklist paired with time-stamped photographic evidence is widely considered the strongest documentation a tenant or landlord can produce to support or defeat a deposit claim, a point underscored by how Florida law treats deposit notice and evidence. That combination of a written, signed record and dated photos covers both what was agreed and when it was captured, which is exactly what gets scrutinized if a dispute goes further.
Condition legend, shorthand codes, and a concise keys inventory to use at check-in
Consistent language keeps both parties recording the same thing the same way. Use this legend across the whole checklist:
- Brand new: unused, no signs of wear.
- Excellent: like new, no visible flaws.
- Good: normal wear, fully functional, no damage.
- Fair: noticeable wear or minor damage, still usable.
- Poor: significant damage or not functioning.
For quick notes, shorthand codes save space: NC (needs cleaning), NR (needs repair), RP (replace), and SC (scratched). Expand any shorthand into a full written note whenever the issue is significant enough to affect the deposit.
Keys deserve their own table, since missing keys are a common source of move-out disputes, a pattern reflected in the keys logs built into inventory reports like the one from Rushcliffe.
At check-in, test locks on every exterior door, window latches, smoke and carbon monoxide alarms, and major appliances before signing off, so any problem gets caught while it’s still fresh.
When to consider a managed inventory and check-in service
Running this process well for one property is manageable. Running it across several properties, several countries, or a rotating crew is a different job entirely, and it’s exactly where we built all-inclusive worker housing around a single point of contact instead of a chain of landlords, agents, and property managers.
We handle property sourcing, booking, and check-in management as one process, which means signed inventories, time-stamped photos, and key counts come back to you as consolidated records rather than scattered emails from different vendors. For project managers coordinating crews across multiple sites, or insurance teams relocating displaced policyholders who need documentation fast, that consolidation removes a genuine administrative burden, especially when language differences or local paperwork norms complicate a DIY checklist. If your team needs housing arranged with the inventory and check-in handled as part of the booking, our contractor accommodation page outlines how we set that up, typically within 24 hours of inquiry.
Practical perspective: frequent move-in mistakes and quick fixes
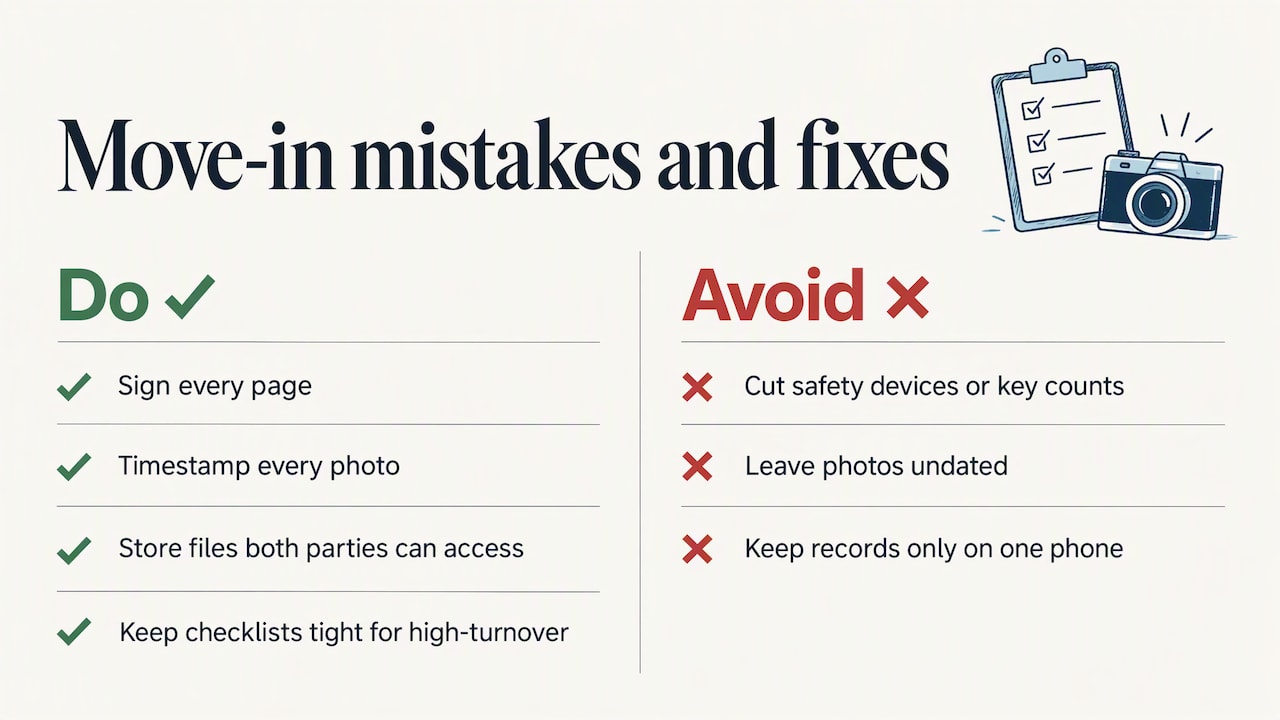
Keep checklists tight for high-turnover properties, but never cut the safety devices or key counts to save time. Those are the two categories most likely to cause a dispute later. The most common failures aren’t complicated: a page nobody signed, a photo with no date attached to it, or a folder of records stored on one person’s phone with no backup anywhere else.
Each of those is a process fix, not a bigger form. Sign every page, timestamp every photo, and put the whole file somewhere both parties can reach it. For anyone managing rotating crews across several properties, that kind of consolidated documentation is the difference between resolving a deposit question in minutes and reconstructing it from memory weeks later.
— Fan
FAQ
How soon after moving in should I complete the inventory?
Complete your condition inspection within three days of moving in, a timeframe recommended across multiple official checklists and guidance sheets. Completing it any later makes it harder to prove pre-existing damage versus damage that happened after move-in.
Do both the tenant and landlord need to sign the checklist?
Yes, both parties should sign every page of the inventory, or initial additional pages, and each should keep a dated copy. This shared, signed record is what makes the document useful if a dispute ever comes up at move-out.
What’s the best way to name and organize move-in photos?
Use a consistent filename pattern that includes the room, item, and date, such as “kitchen_sink_2026-05-01.jpg,” and reference that exact filename on the matching checklist row. Keep unedited originals backed up to a cloud folder so timestamps and image data stay intact.
How does the move-in checklist help at move-out?
At move-out, you compare the same checklist against current conditions, item by item, using the original signed notes and photos as the baseline. A signed checklist paired with time-stamped photos is widely regarded as the strongest evidence for resolving deposit disputes under statutes like Florida’s.
What should I do if the landlord disagrees with something I noted?
Put the disagreement in writing immediately rather than relying on a verbal conversation, and reference the specific checklist item and photo. Many inventory forms ask for discrepancies to be reported within a short window, commonly seven days, so acting quickly protects your position.
Sources
- Florida Statute §83.49
- Condition of Rental Property Checklist (Colorado HCPF)
- Tenant move-in checklist (Berkeley Student Legal Services)
- Inventory and home condition report (Rushcliffe)
Primary sources and downloadable checklist templates to reference or download
Download and adapt official templates rather than starting from a blank page: the Colorado rental property condition checklist, the Berkeley move-in checklist, and the Rushcliffe inventory and home condition report all offer ready-to-print formats. Check the Florida Statute §83.49 for an example of how deposit notice timing is handled in statute, and save a signed PDF copy of your own completed inspection as soon as it’s done.
Complete and sign a room-by-room inventory with time-stamped photos within three days of moving in. This protects deposit rights and heads off disputes before they start. At minimum, your checklist needs signatures from both parties, photo evidence tied to each item, and an exact count of keys received. The printable template below covers every room, fixture, and safety device you need to record.
TL;DR:
- Completing the inventory within three days of move-in reduces disputes by providing timely, accurate condition documentation that is harder for either party to dispute later.
- Both tenant and landlord must sign every page and keep a copy, ensuring mutual agreement and clear reference points during move-out or disputes.
- Photos should be timestamped, unedited, and referenced with consistent filenames linked to specific checklist items to serve as credible evidence in legal or deposit disputes.
- Key safety devices and major appliances require testing and documented confirmation during move-in to prevent safety-related deposit deductions or liability issues.
- Using standardized checklists for room-by-room condition reports, including detailed notes and photos, is essential for establishing baseline conditions and supporting fair deposit return processes.
Table of Contents
- A fillable move-in inventory template: exterior, rooms, fixtures, appliances, and keys
- How to complete, sign, share, and retain the move-in inventory
- How to take and organize photos and video so they clearly support the checklist
- Condition legend, shorthand codes, and a concise keys inventory to use at check-in
- When to consider a managed inventory and check-in service
- Practical perspective: frequent move-in mistakes and quick fixes
- FAQ
- Sources
- Primary sources and downloadable checklist templates to reference or download
A fillable move-in inventory template: exterior, rooms, fixtures, appliances, and keys
A usable inventory starts with the basics: property address, tenant and landlord contact details, the move-in date, the date of inspection, and signature lines for everyone present. Skip any of these and the document loses its value if a dispute ever reaches a deposit hearing or small claims court.
From there, work through the property in a fixed order so nothing gets missed. Government and housing authority templates consistently list the same core areas: living spaces, kitchen, bedrooms, bathrooms, exterior, and safety devices, each with columns for condition on arrival and condition at move-out, according to the Colorado rental property checklist. Following that same structure keeps your version compatible with what most landlords and courts already expect.
Each row in your checklist should capture:
- Item: the specific fixture, surface, or appliance (e.g., “kitchen faucet,” “bedroom 2 closet door”).
- Condition on arrival: using the rating scale covered later in this guide.
- Notes: a short written description of any damage, wear, or missing part.
- Photo reference: the filename of the photo that documents this item.
- Quantity: for countable items like keys, remotes, or smoke detectors.
- Replacement cost (optional): useful for landlords estimating potential deductions.
Here’s how that structure looks applied to a typical property:
| Area | Item | Condition on arrival | Photo reference |
|---|---|---|---|
| Kitchen | Refrigerator | Good | kitchen_fridge_2026-05-01.jpg |
| Kitchen | Stove/oven | Excellent | kitchen_stove_2026-05-01.jpg |
| Kitchen | Dishwasher | Fair, interior rust spot | kitchen_dishwasher_2026-05-01.jpg |
| Living room | Carpet | Good, minor wear by door | living_carpet_2026-05-01.jpg |
| Bedroom 1 | Smoke alarm | Tested, working | bed1_smoke_2026-05-01.jpg |
| Bathroom | Exhaust fan | Good | bath_fan_2026-05-01.jpg |
| Exterior | Fence/gate | Fair, loose latch | exterior_gate_2026-05-01.jpg |
Beyond the rooms themselves, a complete checklist covers appliance checks for the refrigerator, stove, and dishwasher, safety checks for smoke and carbon monoxide alarms, the location of utility meters, and any outdoor areas like yards, decks, or sheds. University and tenancy guidance, including the Berkeley Student Legal Services move-in checklist, builds in explicit fields for photo and video evidence alongside each item, which is worth copying into your own version regardless of where you live.
Many official templates also recommend that tenants test smoke and carbon monoxide alarms during the walkthrough and sign a line confirming the alarms were tested in their presence and found working, a detail drawn from practice in Colorado’s rental condition checklist. That single line of documentation can matter a great deal if a safety issue comes up later.
Finally, every template needs a condition-rating legend. Use Brand New, Excellent, Good, Fair, or Poor for full descriptions, and shorthand codes like NC (needs cleaning), NR (needs repair), or RP (replace) for quick notes in tight spaces. The next sections explain exactly how to use these codes and how to complete the process from start to finish.
How to complete, sign, share, and retain the move-in inventory
Timing matters as much as content. Complete your condition inspection promptly after moving in, as recommended across multiple official checklists and guidance sheets to ensure accurate evidence before memory fades. Waiting a week to document a stained carpet makes it harder to prove the stain was already there.
The process itself works best as a joint effort:
- Walk through the property together with the tenant and landlord (or property manager) present, whenever that’s possible.
- Go room by room, filling in condition notes and taking photos as you go rather than relying on memory afterward.
- Flag anything questionable in writing immediately rather than making a verbal note to “deal with it later.”
- Have both parties sign every page, or initial additional pages if the document runs long, matching the practice shown in the Rushcliffe inventory and home condition report.
- Give each party a dated copy on the spot, whether that’s a physical printout or an emailed PDF.
If something concerns you during the walkthrough, write it down on the inventory itself, but keep repair requests as a separate communication to the landlord or property manager. Mixing a condition note with a repair demand on the same document can confuse which parts are an agreed record of condition and which parts are an open request.
Pro Tip: Scan or photograph the signed inventory the same day and save it to a cloud folder shared with the other party, so neither side can later claim they never received a copy.
Storage matters just as much as completion. Keep the original signed pages, export a PDF version for your records, and back up every photo and file to a cloud folder with a clear naming system. Retain these records for the full length of the tenancy, and don’t delete anything until any deposit dispute is fully resolved. A folder that takes five minutes to set up at move-in can save hours of arguing at move-out.
How to take and organize photos and video so they clearly support the checklist
Photos only help if they’re easy to connect to a specific checklist line. Start each item with a wide-angle shot of the room, then follow with close-ups of any damage, wear, or detail worth recording. For appliances, photograph serial numbers and, where relevant, current meter readings, since these details can matter later for billing or warranty questions.
A few habits make a real difference in how credible your evidence is:
- Use your camera’s built-in time stamp, or include a phone screen showing the date somewhere in the frame.
- Keep original, unedited files rather than cropped or filtered versions, since edits can raise questions about what was altered.
- Adopt a consistent filename convention, such as “kitchen_sink_2026-05-01.jpg,” and reference that exact filename in the matching checklist row.
- Record a short video, under 60 seconds, panning each room and narrating the condition out loud, then note that video’s filename on the checklist too.
A signed checklist paired with time-stamped photographic evidence is widely considered the strongest documentation a tenant or landlord can produce to support or defeat a deposit claim, a point underscored by how Florida law treats deposit notice and evidence. That combination of a written, signed record and dated photos covers both what was agreed and when it was captured, which is exactly what gets scrutinized if a dispute goes further.
Condition legend, shorthand codes, and a concise keys inventory to use at check-in
Consistent language keeps both parties recording the same thing the same way. Use this legend across the whole checklist:
- Brand new: unused, no signs of wear.
- Excellent: like new, no visible flaws.
- Good: normal wear, fully functional, no damage.
- Fair: noticeable wear or minor damage, still usable.
- Poor: significant damage or not functioning.
For quick notes, shorthand codes save space: NC (needs cleaning), NR (needs repair), RP (replace), and SC (scratched). Expand any shorthand into a full written note whenever the issue is significant enough to affect the deposit.
Keys deserve their own table, since missing keys are a common source of move-out disputes, a pattern reflected in the keys logs built into inventory reports like the one from Rushcliffe.
At check-in, test locks on every exterior door, window latches, smoke and carbon monoxide alarms, and major appliances before signing off, so any problem gets caught while it’s still fresh.
When to consider a managed inventory and check-in service
Running this process well for one property is manageable. Running it across several properties, several countries, or a rotating crew is a different job entirely, and it’s exactly where we built all-inclusive worker housing around a single point of contact instead of a chain of landlords, agents, and property managers.
We handle property sourcing, booking, and check-in management as one process, which means signed inventories, time-stamped photos, and key counts come back to you as consolidated records rather than scattered emails from different vendors. For project managers coordinating crews across multiple sites, or insurance teams relocating displaced policyholders who need documentation fast, that consolidation removes a genuine administrative burden, especially when language differences or local paperwork norms complicate a DIY checklist. If your team needs housing arranged with the inventory and check-in handled as part of the booking, our contractor accommodation page outlines how we set that up, typically within 24 hours of inquiry.
Practical perspective: frequent move-in mistakes and quick fixes
Keep checklists tight for high-turnover properties, but never cut the safety devices or key counts to save time. Those are the two categories most likely to cause a dispute later. The most common failures aren’t complicated: a page nobody signed, a photo with no date attached to it, or a folder of records stored on one person’s phone with no backup anywhere else.
Each of those is a process fix, not a bigger form. Sign every page, timestamp every photo, and put the whole file somewhere both parties can reach it. For anyone managing rotating crews across several properties, that kind of consolidated documentation is the difference between resolving a deposit question in minutes and reconstructing it from memory weeks later.
— Fan
FAQ
How soon after moving in should I complete the inventory?
Complete your condition inspection within three days of moving in, a timeframe recommended across multiple official checklists and guidance sheets. Completing it any later makes it harder to prove pre-existing damage versus damage that happened after move-in.
Do both the tenant and landlord need to sign the checklist?
Yes, both parties should sign every page of the inventory, or initial additional pages, and each should keep a dated copy. This shared, signed record is what makes the document useful if a dispute ever comes up at move-out.
What’s the best way to name and organize move-in photos?
Use a consistent filename pattern that includes the room, item, and date, such as “kitchen_sink_2026-05-01.jpg,” and reference that exact filename on the matching checklist row. Keep unedited originals backed up to a cloud folder so timestamps and image data stay intact.
How does the move-in checklist help at move-out?
At move-out, you compare the same checklist against current conditions, item by item, using the original signed notes and photos as the baseline. A signed checklist paired with time-stamped photos is widely regarded as the strongest evidence for resolving deposit disputes under statutes like Florida’s.
What should I do if the landlord disagrees with something I noted?
Put the disagreement in writing immediately rather than relying on a verbal conversation, and reference the specific checklist item and photo. Many inventory forms ask for discrepancies to be reported within a short window, commonly seven days, so acting quickly protects your position.
Sources
- Florida Statute §83.49
- Condition of Rental Property Checklist (Colorado HCPF)
- Tenant move-in checklist (Berkeley Student Legal Services)
- Inventory and home condition report (Rushcliffe)
Primary sources and downloadable checklist templates to reference or download
Download and adapt official templates rather than starting from a blank page: the Colorado rental property condition checklist, the Berkeley move-in checklist, and the Rushcliffe inventory and home condition report all offer ready-to-print formats. Check the Florida Statute §83.49 for an example of how deposit notice timing is handled in statute, and save a signed PDF copy of your own completed inspection as soon as it’s done.

Contact us today to discuss your next project